Case Study 1
This case study has been prepared to show how to use s3qm for a proposed single house allotment to satisfy the NorBE test.
Site and Development Summary
The proposed development is to build a new house on a vacant lot of cleared urban land.
SITE CHARACTERISTICS |
|
Site Location: |
Goulburn |
|
Total site area: |
720m2 |
Proposed development characteristics |
House roof 240m2 Driveway and path – 110m2
|
|
Existing Land Use |
Urban (no impervious areas) |
Soils |
Clay |
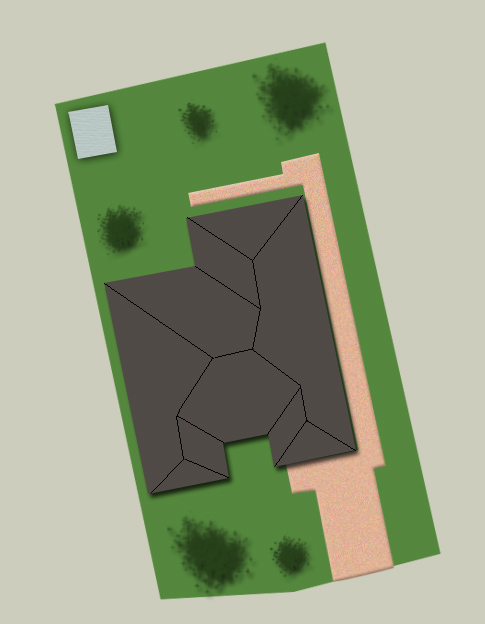
Proposed Site Layout
Targets to be achieved
Stormwater Quality
The development will need to demonstrate compliance with the NorBE test for water quality, that is the loads of the developed site need to be 10% less than the existing site.
Solution
- Click on Create a New Project button on the home screen
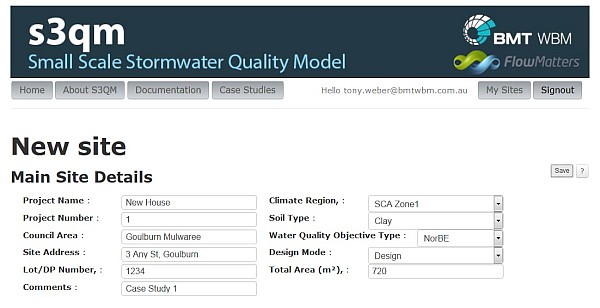
- Enter site details in the Main Site Details section
- Select the Climate Region (Goulburn is in SCA Zone 1)
- Select the Soil Type as Clay
- Select Assessment Type as NorBE and the Design Mode as Design
- Set the total area (720m2) - the site details should look like below
- Click on the Save button
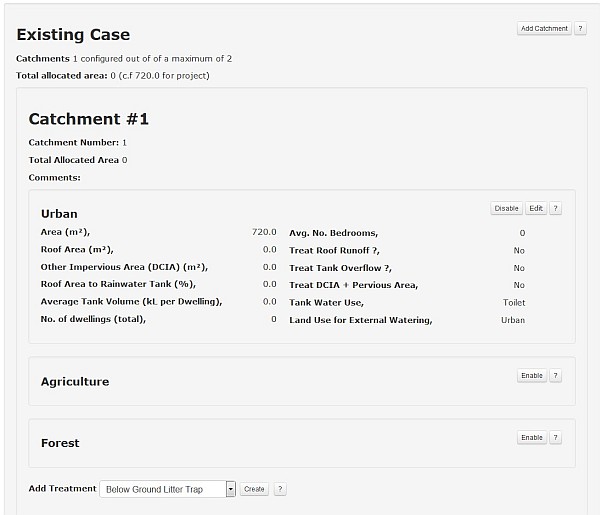
- Now set up the existing catchment as per below. To do this, click on Enable in the top left corner of the Urban box for the Existing Catchment, then enter the key details as per below and click Save
- Under 'Developed Case', click on Enable in the urban land use box.
- Enter the total area of urban (equal to the site area in this case), plus the area of roof (240m2, and the other impervious area (110m2 i.e. the driveways and paths)
- We anticipate that 75% of the roof is going to be directed to the tank so enter 75 in the Roof Area to Rainwater Tank box
- The tank size will be dictated by what the BASIX requirement is plus any additional water we may need for garden watering or other uses - in this case we will use 3kL.
- Enter in the number of dwellings (just 1, as there is only 1 house)
- Enter the average number of bedrooms per dwelling (4)
- We have the choice of what areas will need treatment, but given we need to achieve a Neutral or Beneficial Effect we should try to treat as much area as possible, so select each of the boxes for treatment
- The next box is for us to choose how the water in the rainwater tank is to be used within the house. We should aim to use it for as many internal uses as possible, but this depends on what the Council will allow also. In this case, we will just select Toilet + Laundry for the rainwater.
- The final box is to select the land use that dictates the outdoor watering rate. As we have a domestic house, we will select Urban
- Click on the Save button - the final configuration should look like the image below

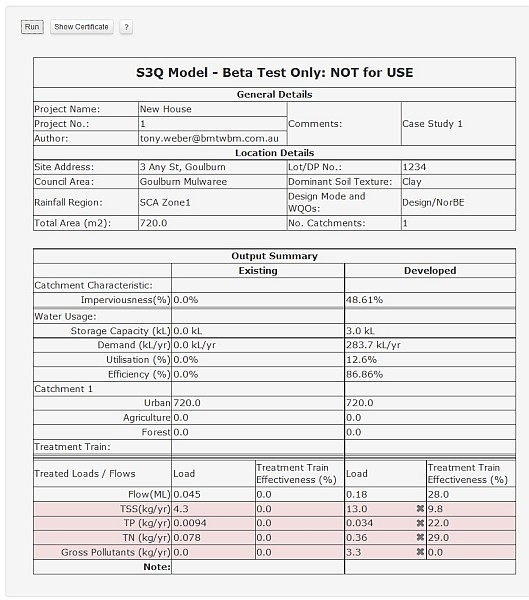
- We can now check to see how well the rainwater tank on its own will do in reducing loads, so scroll down and click on the Run button
- The above output shows that the rainwater tank does some of the work, but we will still need some more treatment. One thing we can see from the above is that we are only utilising about 13 percent of the water produced by the roof, so a bigger tank should help us. To change this, click on the edit button in the Urban box under the Developed Catchment and change the tank size to 5.
- We now need to add some treatment measures. s3qm will let us develop a treatment train of measures, and we should start off with a simpler measure first to see how that goes
- Click on Add Treatment and select a swale. This is just a small vegetated channel that helps water flow down our site rather than using a pipe (where it won't be treated). Select a width, say 3m wide (you could use a narrower one if space was an issue).
- Next, choose a slope that corresponds to one of the 3 values allowed. Only 3 different slopes are allowed as this is the type of slopes where swales work best. We can choose 3 percent here
- Finally, choose a length from the available lengths. These lengths are set to these values simply to reduce the combinations that the s3qm has to model. We will use 20m
- Click Save
- We will now add another treatment, in this case a raingarden, or more correctly, a biofiltration system. Click on Add Treatment, then select Biofiltration
- A bioretention system is simply a soil filter with plants growing on the top of it. We need to set up the area of the system first, in this case we will use 15 for 15m2
- We also need to set how deep the water can pond on the top of the filter while it seeps through the soil, we will chose 0.2m so it will have up to 200 mm of water ponded in it during a storm
- Finally choose the depth of the soil filter, either 0.4 or 0.6 m. These values have been used in s3qm to represent the shallower and deeper filters that can be used.
- Click Save
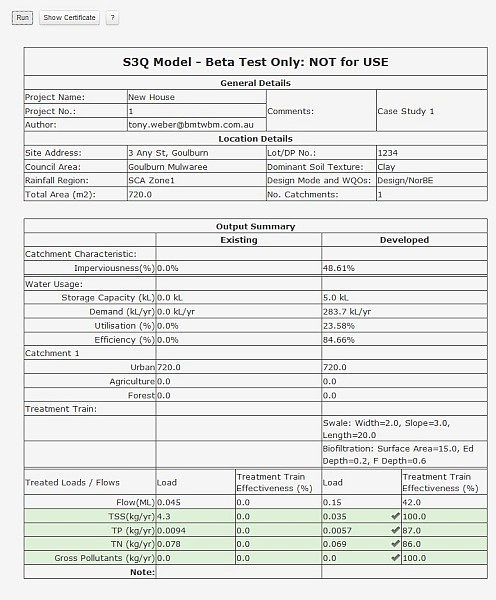
- Now comes the big test, do we meet NorBE with our system. Click on Run to see if we get some ticks and green rows showing that we have met the criteria
- We can see that we have managed to demonstrate NorBE with our treatment train, so all that is left now is to print this out and submit to Council.
- Click Show Certificate and the certificate will be produced (to print it, for most browsers, hold down the Ctrl key and press P)
- This Certificate can now be printed out and submitted to Council with a layout plan showing accurately sized treatment measures to ensure that they will fit in the site layout.
Case Study 2
This case study has been prepared to show how to use s3qm for a proposed townhouse development.
Site and Development Summary
The proposed development will replace several existing dwellings in Tuncurry, and will result in dual occupancy town houses being constructed.
SITE CHARACTERISTICS |
|
Site Location: |
Tuncurry |
|
Total site area: |
2,400m2 |
Proposed development characteristics |
Townhouse roof 500m2 Paved areas – 845m2
|
|
Existing Urban Area? |
Yes |
Soils |
Sandy |

Proposed Site Layout
Targets to be achieved
Stormwater Quality
The following pollutants will need to be reduced by the percentage reduction noted (as compared to the same development with no treatment):
| Gross Pollutants | 90% reduction |
| Total Suspended Solids | 80% reduction |
| Total Phosphorus | 60% reduction |
| Total Nitrogen | 45% reduction |
Stormwater Flows
The development will need to demonstrate that all reasonable management actions have been taken to reduce the impervious areas that are directly connected to the stormwater system.
Solution
- Enter site details
- Select the Climate Region (Taree is best for the Great Lakes Council region)
- Select the Soil Type as Sandy
- Select Water Quality Objective Type as TTE and the Design Mode as Solve
- Set the total area (2400m2)
- Click on the Save button
- Enter the Target Treatment Train Effectiveness Reductions and click Save
- Under 'Developed Case', enable the urban land use.
- Enter the total area of urban (equal to the site area in this case), plus the area of roof, and the other impervious area (i.e. the driveways and paths)
- Since the Deemed to Comply solve mode is being used, the roof area to tank is set to 75%, meaning 3/4 of the roof will drain to the tank. Adjust this as necessary
- Enter in the number of dwellings (i.e. 3 x 2 in this case)
- Enter the average number of bedrooms per dwelling
- Click on the Save button
- Scroll down and click on the Run button
- The solver will now run and after a brief pause, the results will be presented. If the Load and TTE boxes are green, then a suitable "Deemed to Comply" solution has been found.
- The Output Summary will also show the size of biofiltration needed and the total volume of tanks required.
- Click Show Certificate and the certificate will be produced.
- This Certificate can now be printed out and submitted to Council with a layout plan showing accurately sized treatment measures to ensure that they will fit in the site layout.


Email : help@s3qm.com.au